
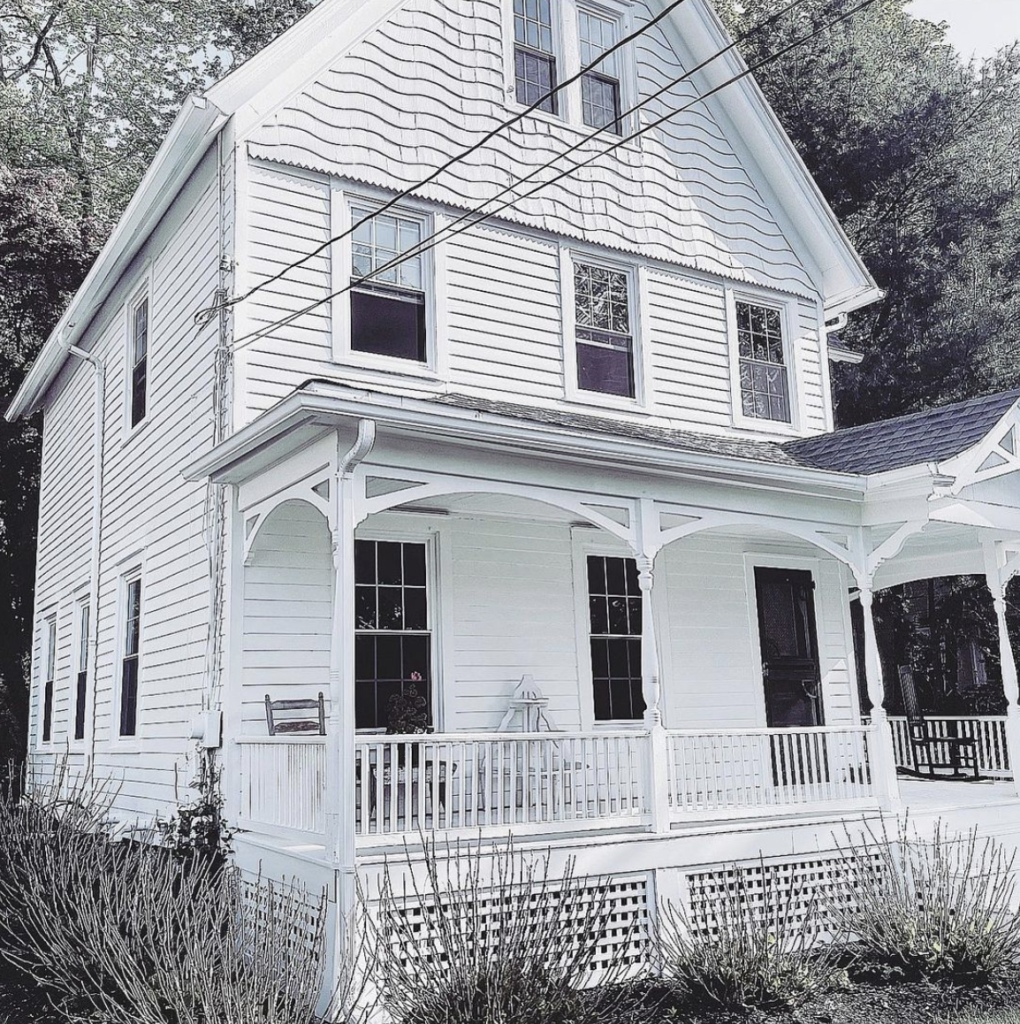
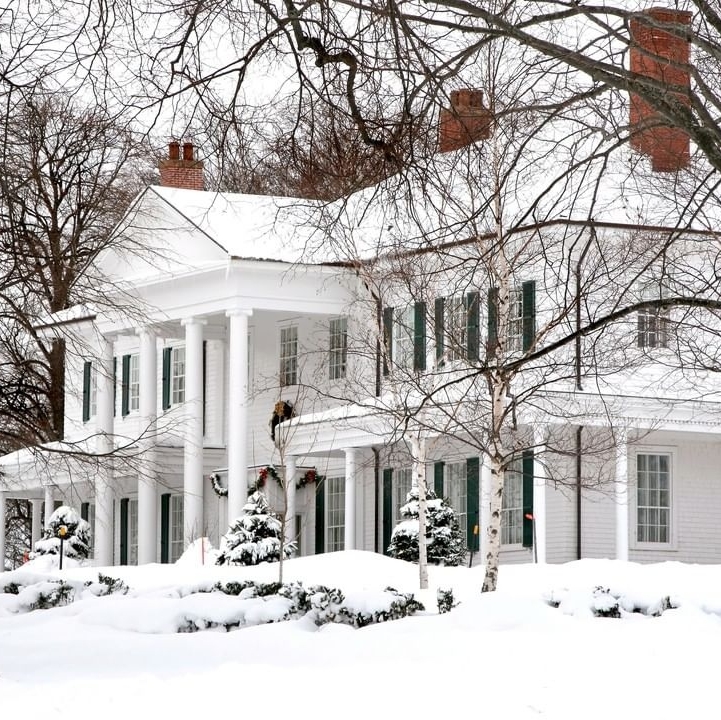
We don’t have many early photos of the house, with the exception of one. It was taken in 1908, when the house was about 4 years old, and from high up in the church tower about a block away:
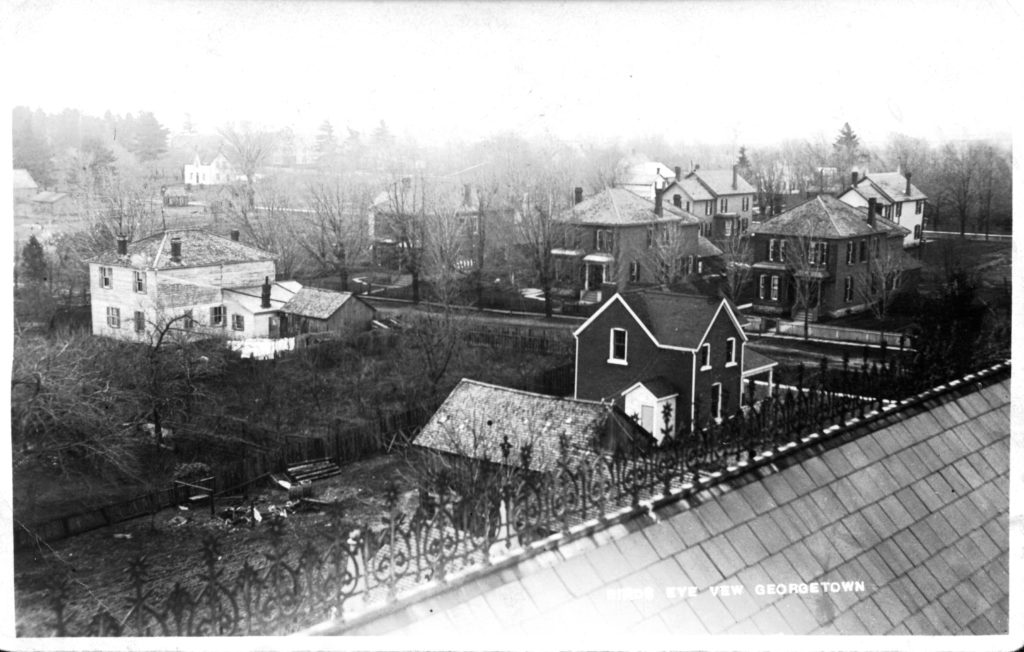
See that little white house in the top right corner? That’s ours!
Of course, upon finding this in the town’s historical archives, the first thing we did was zoom in. We were shocked at what we found! Take a look:
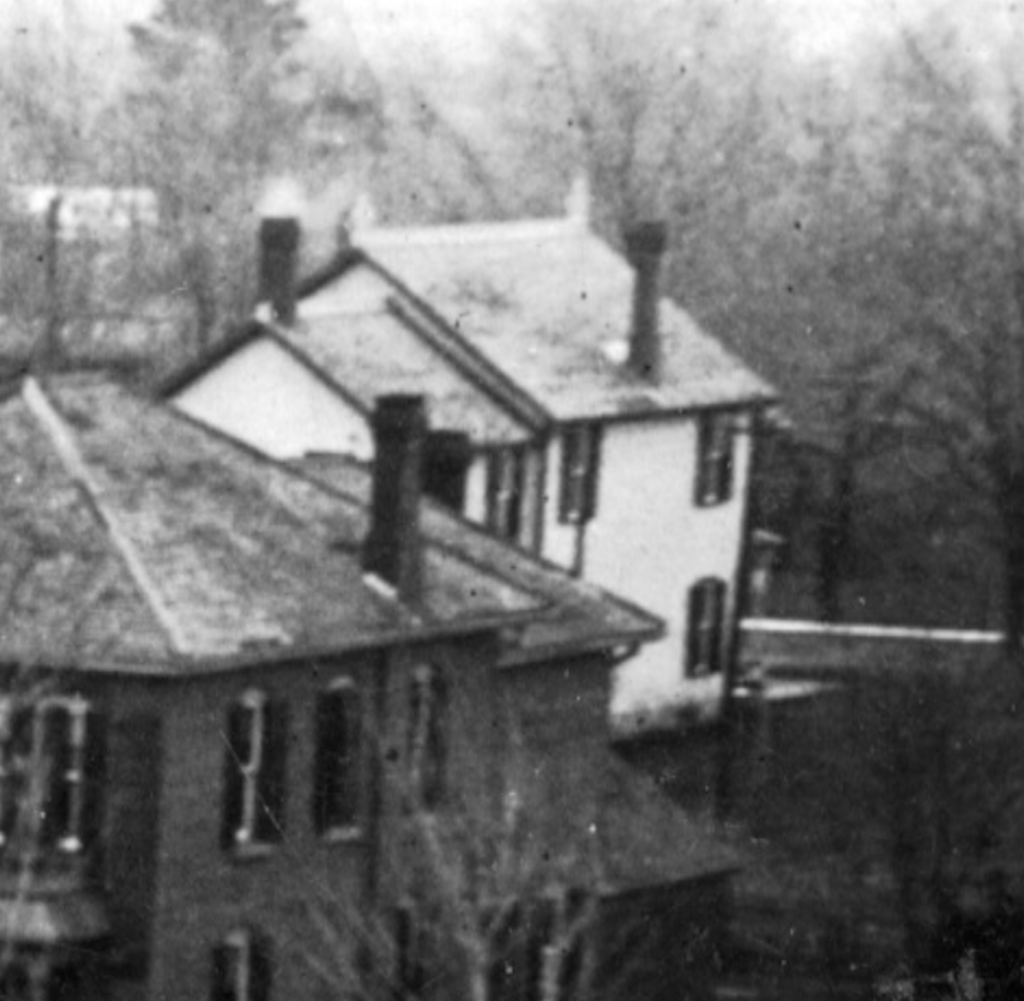
She was (and is!) so pretty.
This was of course before the side-addition was added in the early 2000’s, before fences went up, and empty lots filled in, and likely before residential electricity was available!
It’s amazing how much even a blurry, black & white, rear-angle photo can tell you. We immediately wanted to restore all kinds of things we saw: chimneys, siding, ridge cresting, the front porch, and shutters. But until we get some of the interior work done (hello working shower!), Sarah has made Kevin promise he wont’ start stripping back the exterior.
With one exception that we said we’d do right away: shutters!
Of all the things on the exterior punch list, shutters was one we agreed to prioritize. They’re fairly standalone without having a lot of dependency on other elements. And, perhaps most important for our impatient raring-to-go selves, we felt they could be high-impact to the exterior and add a dose of history, which might just buy us a year or two of exterior satisfaction until we really dive into the bigger stuff like siding and restoring the front porch. Getting some small, early wins on the long, hard road to getting this house into shape felt like it would be good for us.
Shutters? Simple, right…?
As we learned, getting shutters right is more difficult than most people think. And once you see the many ways shutters are often done poorly, you just can’t unsee it.
The good news is: we think we figured it out! We referenced old photos, found inspiration, took clues from our house and neighbourhood, talked to experts, and poured through research on historical shutters. Whew!
We’re excited to have custom, authentic, hand-crafted shutters in production as we speak! Depending on the weather, we’ll be installing as early as next week. So, while we patiently wait shutter day to come, we’re compiling all that we learned in this blog post and, next week, will share an update once they’re installed.
First, some terminology and history.
Even though we’re using the term ‘shutters’ here, the technically correct word in our case is ‘blinds’. Yes, they’re actually ‘Outside Blinds’, and its what we would have called for if we were building this house in 1904.
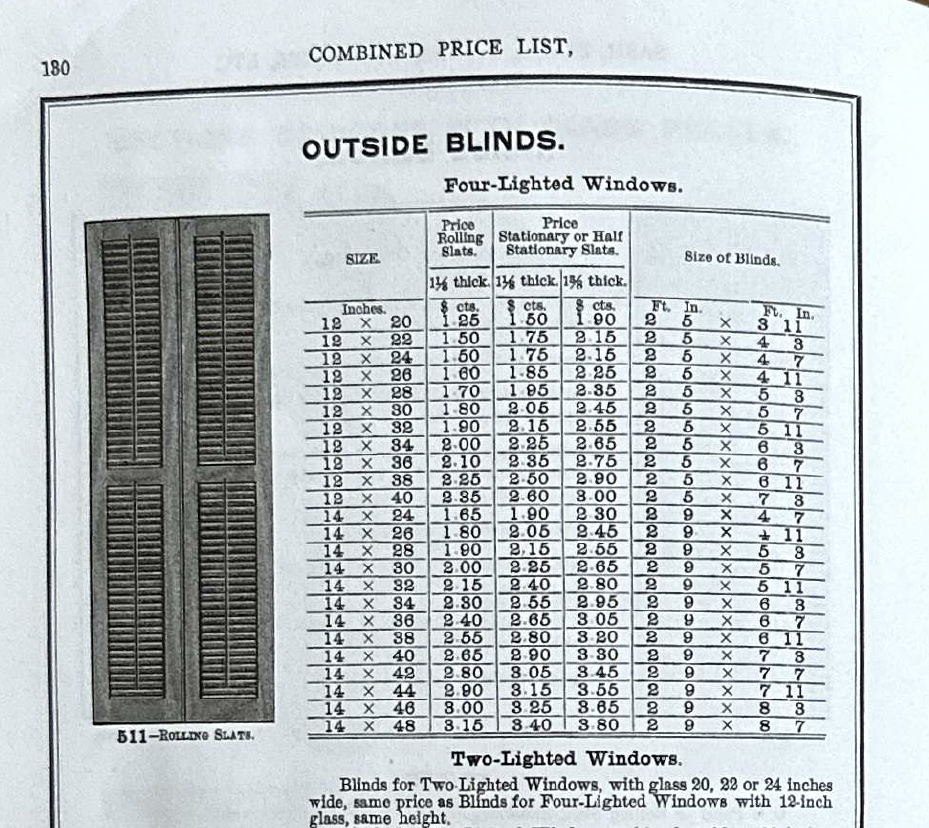
Check out the pages here from my 1893 Mulliner Catalog of Turn-of-the-Century Doors, Windows, and Decorative Millwork:
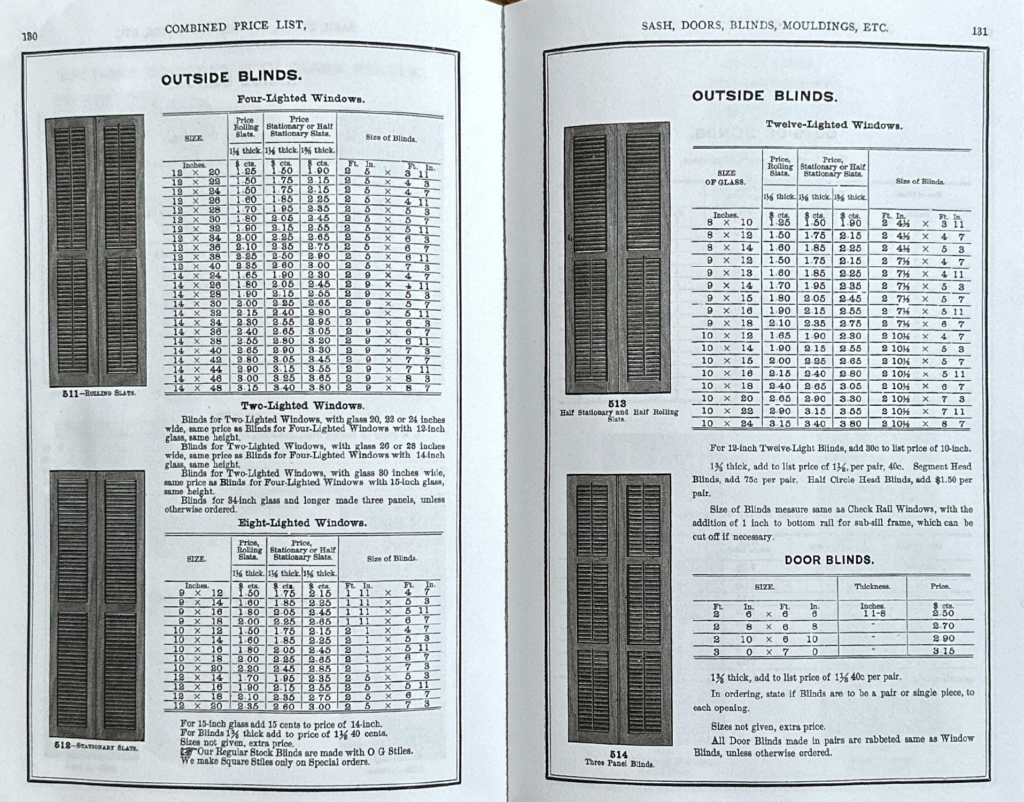
‘Shutters’, as we would call them today, were originally technically called ‘Outside Blinds’ if they did in fact feature slats or louvers like these. As seen in The Mulliner Catalog of 1893.
The key is whether they feature slats, sometimes called ‘louvers’. If so, they were blinds.
For this post, though, we’re going to keep referring to them as shutters.
The other thing to keep in mind is that shutters served a purpose historically – they weren’t just decorative elements nailed to the sides of windows. Before air conditioning, air sealing, weather stripping, more modern windows, etc. shutters quite literally had the job of providing better shelter conditions by protecting from the exterior elements. They kept the hot sun, cold snow, and high winds out of the house and away from the glass. In order to do that, they had to function properly (like open and close, and completely cover the window opening).
So the name of the game is getting your shutters to look like they actually perform that function. Do this and you’ll achieve the historical authenticity you’re after. Of course, they don’t have to actually operate to achieve this (lots of great projects we came across chose inoperable shutters that look operable), although it’s kind of cool if they do.
Our Shutter Inspiration
1- Our own house
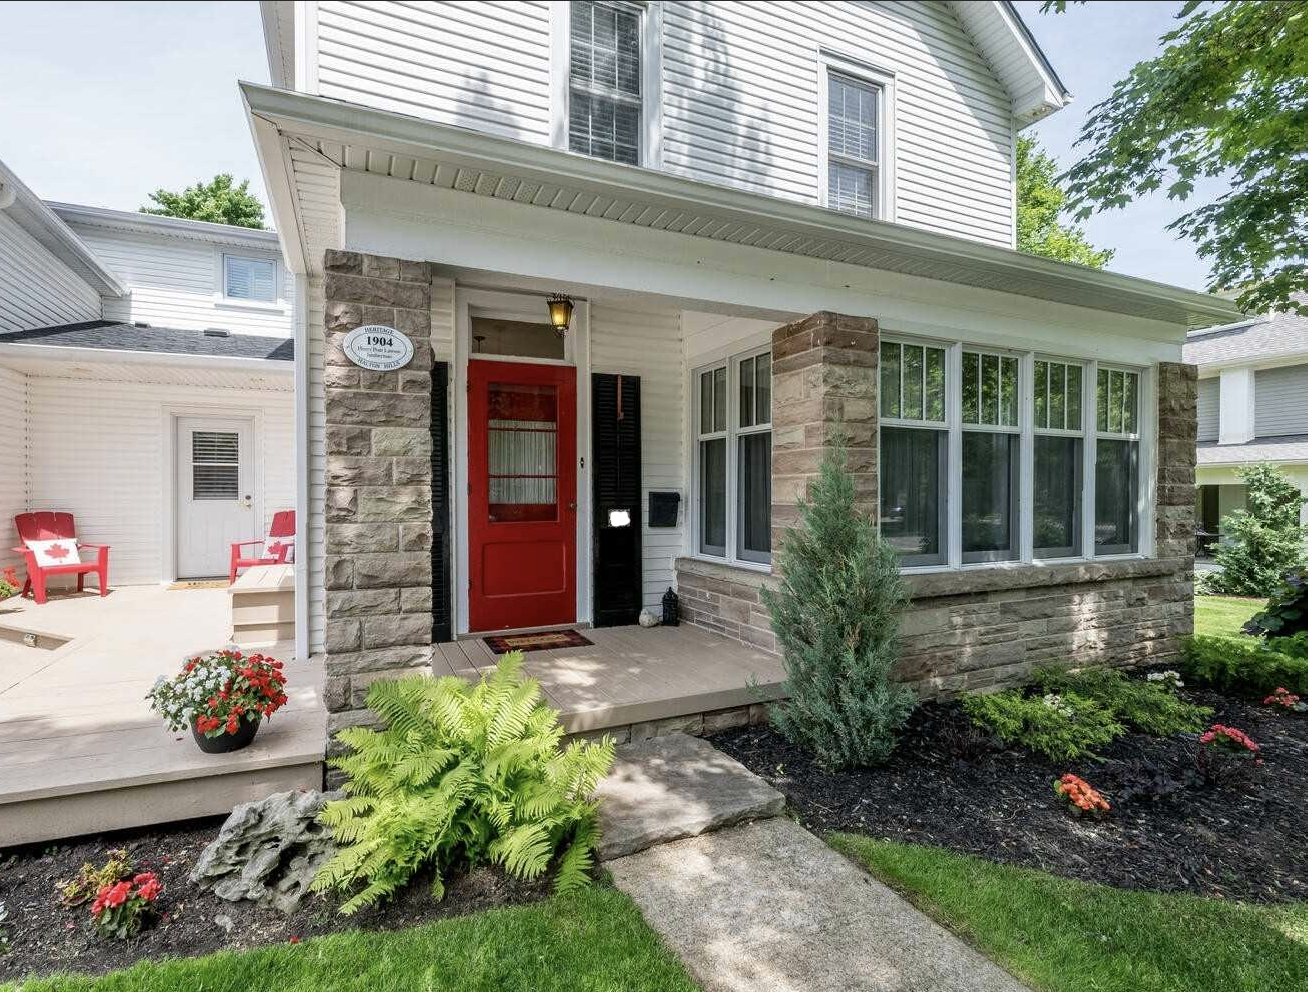
Besides the 1908 photo, we actually had one more clue about the original shutters on the house. When we moved in, a pair of shutters flanked the front door and we could tell they were old if not original. The only reason this pair survived is likely because they were protected on the front porch all the time.
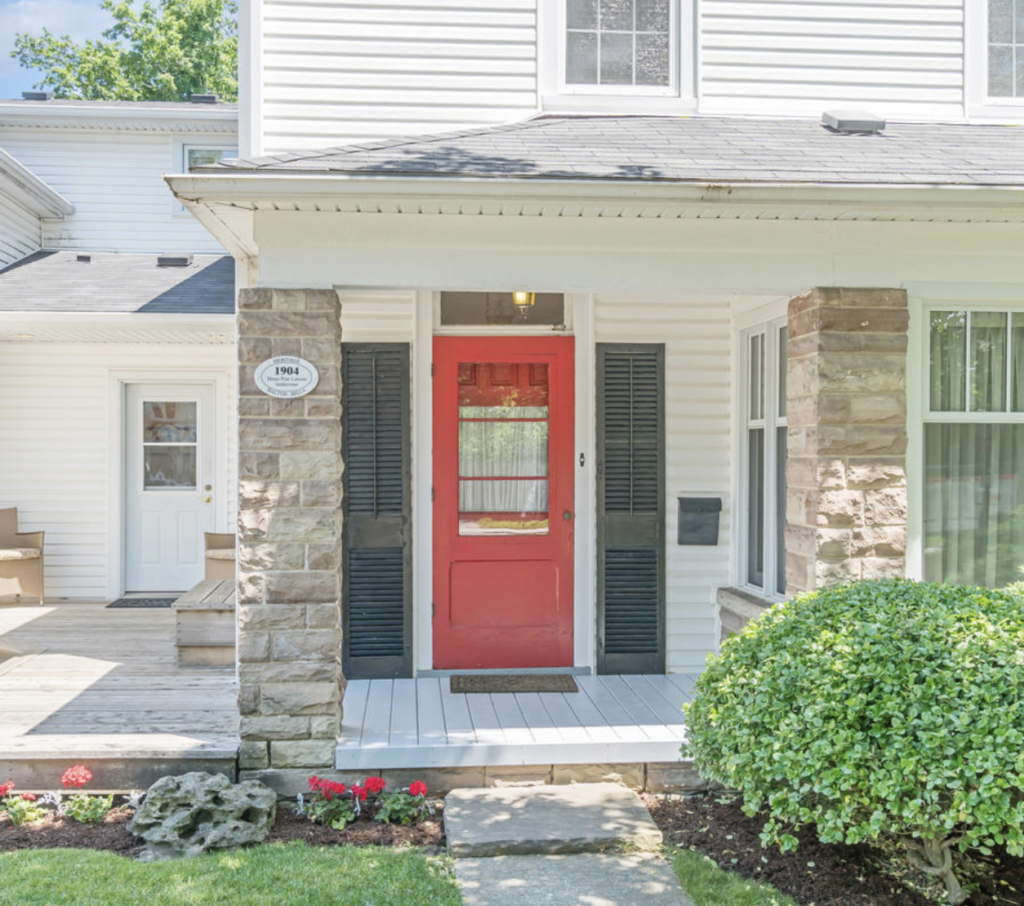
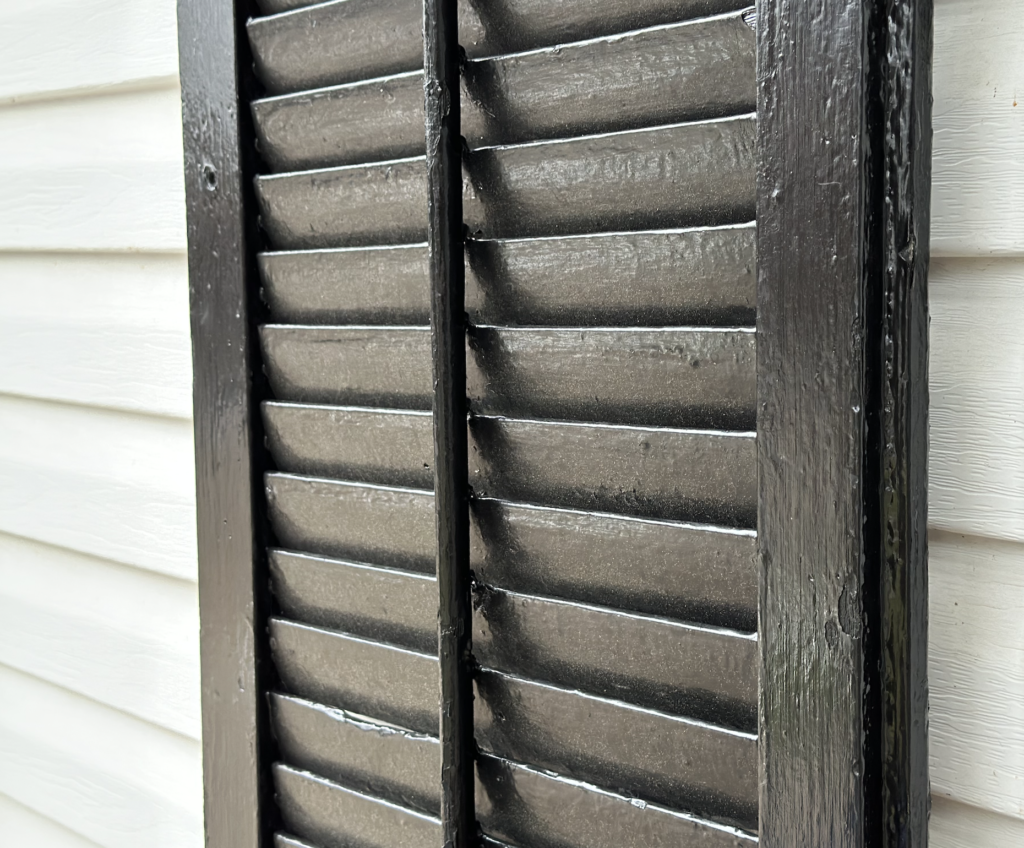
The only pair of shutters left at the house, an old – if not original – set protected by the front porch all these years.
A closeup shows more of the detail that we can learn from: slats, push rods, even the material thickness (unlike most store bought vinyl or aluminum shutters that tend to look flat). In the door frame we can even see the impressions – now under many layers of paint – of where the hinges were mounted, and they correspond with matching impressions on the shutters themselves! A good clue.
Once we determined that these were actually original (or original-ish), we knew we had to get as close to these as possible in the shutters we put on the rest of the house. Mission accepted!
Other Shutter Inspiration
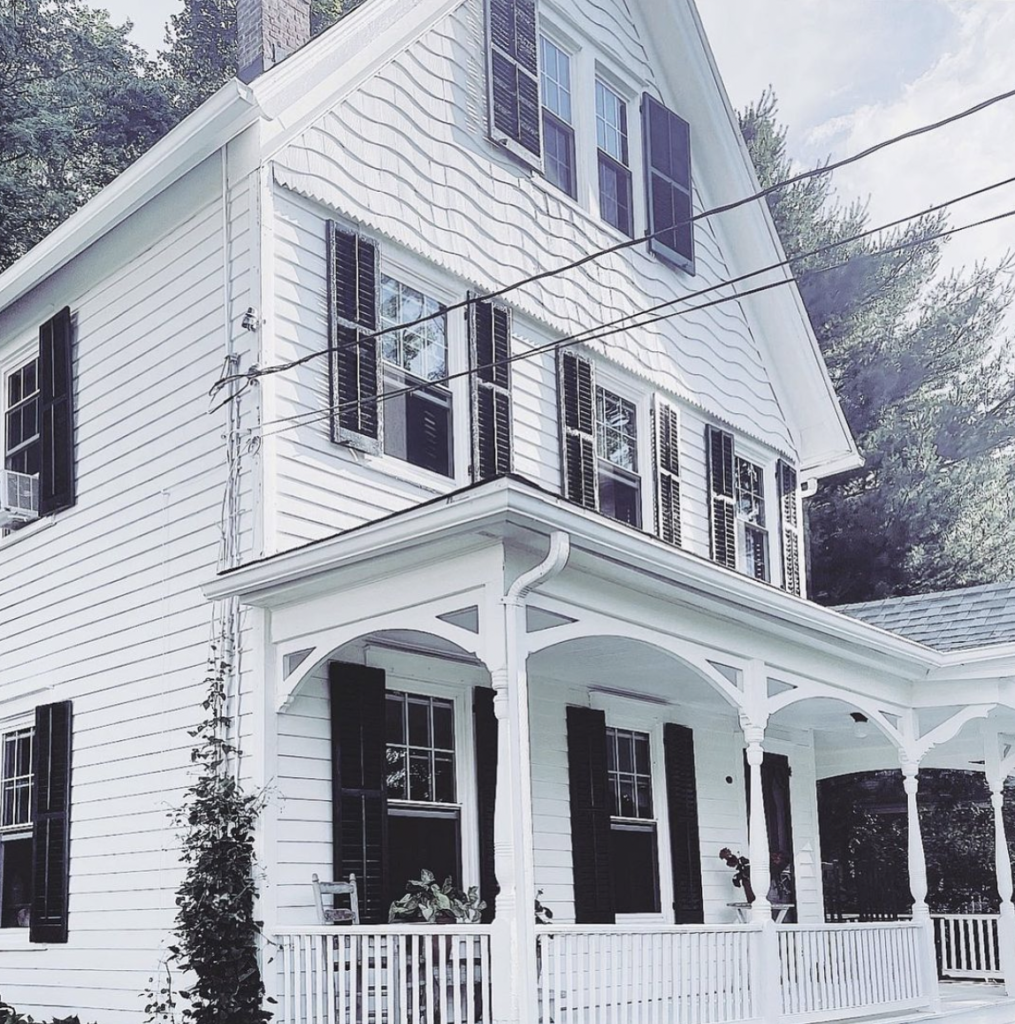
Architect Patrick Ahearn, celebrated for his ability to bring historically accuracy to his New England homes is a major influence for us. His houses, often clad in white clapboard and siding not dissimilar from ours, feature all the beautiful details we could ever dream of. His shutter game is particularly excellent. Look how his shutters below feature real hardware, appear to be of significant size to actually cover their respective window openings, and are mounted off the house in a way which reassures you they could actually swing open and closed properly.
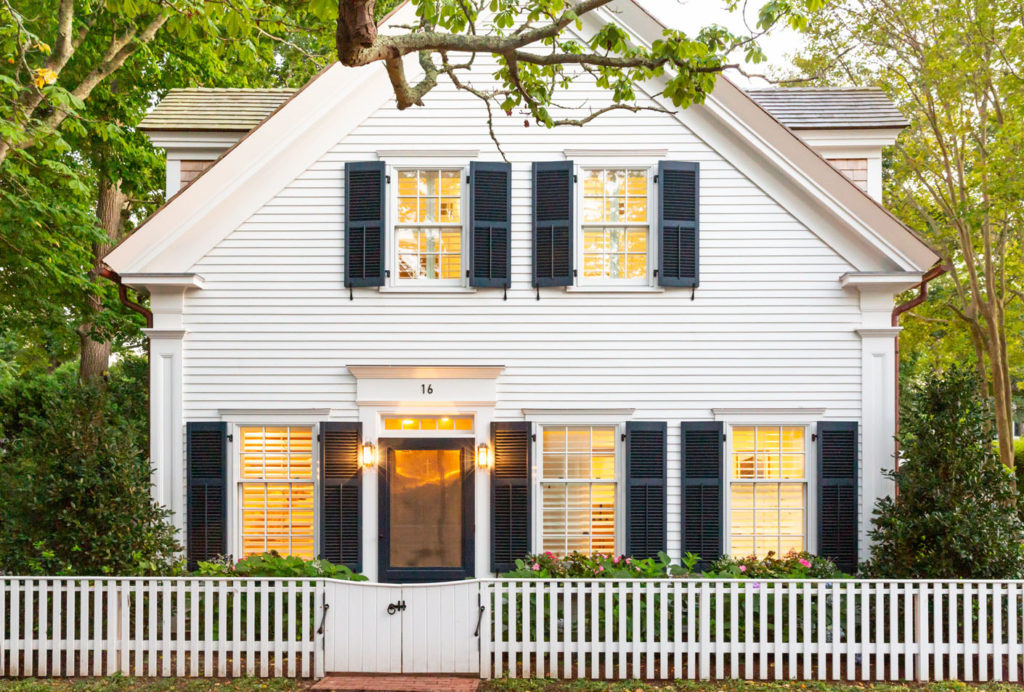
Patrick Ahearn’s Pent Lane Greek Revival Project sports shutters with all the authenticity of originals. Copyright and photography credit: Taylor Ahearn
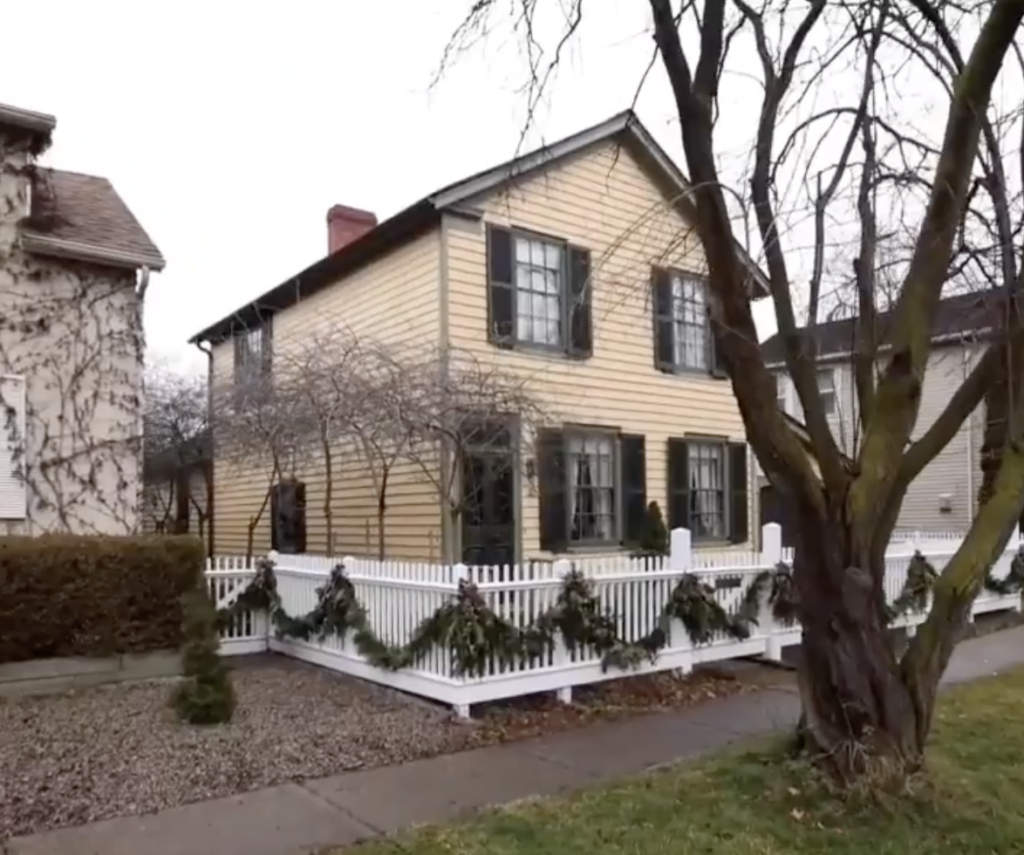
We’ve also just saved no shortage of inspiration across Instagram, Pinterest, and our own travels (like driving through Maine and Vermont last year) where, on a white-sided gabled house, they’re just so classic. We’ll spare you all of those photos, but a really great before and after by Colonie Co on Instagram that shows just how much character they can bring back to a house like ours:
Colonie Co – before shutter installation
Colonie Co – after shutter installation
And, finally a few more inspo photos that had us dreaming:
This home in Niagara on the Lake, Ontario had beautiful shutters installed that got our attention, designed by Canada Custom Shutters.
While it’s a different style house than our new one, our old County House had beautiful shutters which we meticulously refinished and painted (all 30-something shutters….)
Notice in all of these examples just how significant a feature the shutters are. There’s no doubting they belong with the house, they’ve survived many decades, and they look like they actually work – all things we aspire to in our shutter reproductions here in Georgetown.
So, let’s get to it.
Getting your shutters right: the 6 factors
If you’re going to restore, reproduce, and / or add shutters to your house, there are 6 basic but important factors you need to get right. Those decisions are:
- Period – the right style of shutter for the age and architectural style of the house
- Proportions – height, width, and depth corresponds to window openings
- Position – where and how they’re mounted so as to create the right depth, shadow lines, and operability
- Paraphernalia – hinges, tie-backs, push rods, caps: the details that make all the difference
- Physical Material – the material the shutters are made of (ideally wood)
- Paint – colour and finish
These are in logical order of the decisions to be made, roughly. In general, getting #1 right will help set the path forward for all the other factors.
Our house, of course, led us down certain paths that are specific to an early 1900s sided Victorian. No doubt there are decisions you may encounter that are specific to your house. Cutout patterns, for example, are something we didn’t have to think about. But you may!
A sidebar:
All of the information we’re about to share is really just a synthesis of shutter facts we learned from people with far greater expertise and experience than us. If you really want to understand the details and history, those sources were largely:
1- Ken Roginski, Old House Guy: should be one of your go-to resources for understanding how to make better decisions on details related to windows, shutters, siding, and porches. In-depth details. You’ll start reading and, all of a sudden, realize you just spent 2 hours learning about details you never realized were so important.
2- Scott Sidler, The Craftsman Blog: over and above Scott’s skillset and experience, his ability to teach and educate is one we have a ton of respect for. He’s managed to make shutters something fun. His #ShudderSunday meme documents the oh-too-common shutter fails that are out there and his blog post All About Wood Shutters is a terrific 101.
3- Patrick Ahearn, Architect: we introduced Patrick in the inspo above. His blog and instagram feature several posts that cover a brief history of shutters and his work overall is about as good a reference as you could ask for when it comes to getting shutters right.
4- Brent Hull, Hull Millwork: if you want to get the details right in your old house, or a new house with historical accuracy and integrity, stop what you’re doing right now and go follow Brent and the Hull Millwork team. They’re the absolute masters and, perhaps even more impressive, amazing teachers, educators, and communicators. Brent’s videos, including this must-watch 101 on shutter history, components, and installation is the TED Talk of shutters that the world needed.
5- Canada Custom Shutters: when we started reaching out to companies who could supply us with shutters, we knew right away Mark’s team at CCS could help us get the details right. CCS has become the go-to crafters of shutters for significant heritage projects across the country. Not only that, he’s taken down thousands of shutters to take them back to his shop to replicate / repair them. There’s no better education in how historical shutters were made than taking them apart and putting them back together. When he first came by the house, our minds were blown by how much detail he went into. Their instagram is also a hidden gem in shutter inspo.
1- Period
The first thing to figure out: what style shutter was on or would have been on your house originally.
Start with your house
The best source of truth is historical and specific, so start with your very own house as far back as you have photos and let those clues drive your shutter direction moving forward. We got lucky, for example, even with just our fuzzy photo and the old shutters left by the front door.
You can determine if your house had shutters at all by checking the window casing. Even after decades and decades of paint, you’ll still see impressions in the paint where hardware may have been mounted. On siding and brick, depending on how it’s been treated over the years, you can often see the shadowline of where a shutter once stood if you inspect closely enough.
Zoom out to the neighbourhood
If that doesn’t work for you, time to zoom out. Your neighbourhood may have clues. Check houses in your area built at the same time or even by the same families and builders. If there are no good shutter clues on those homes today, do a quick search through your town or region’s historical photos. Each region has nuances on details like shutters. Boston shutters, for example, are known for having little ‘horns’ on the bottom corners of each shutter, meaning that when the shutter closed in the window opening, a horizontal gap between the two horns allowed for drainage and airflow when the house was closed up during storms.
Check architectural product catalogs from that era, if available
If your house is Victorian, you’re in luck. You can check Mulliner, Roberts, or other millwork catalogs to see shutters that would have been readily available at the time your house was built. A bonus here is they often spell out detailed specifications: wood species, finishes, hardware options, and dimensions. Take those things and run with them!
Reference Old House Guy’s shutter guide to understand what types of shutters were used on what types of houses and when. Cross reference with The Crafstman Blog to figure out whether you’re going down the path of:
- Louvered
- Board & Batten
- Flat or Raised Panel
- Cutouts
- Bahama
- Plantation
2- Proportions
This is one of the easier decisions to get right about shutters, but somehow the one that is most commonly missed.
So here’s the secret. Do this one thing and you’ll be in the top 1% of shuttered homes on the planet. Ready?
On any given window, your shutters should be sized so as to close perfectly into the window opening.
A simple little GIF from Patrick Ahearn demonstrates this perfectly:
Source: Patrick Ahearn’s ‘Proper Shutter Etiquette’
Walk around your neighbourhood sometime and stand across the street from a home with shutters. Imagine them swinging closed. Would they perfectly fit within the window opening? 9 times out of 1o, shutters are too narrow or too wide, which right away blows your cover!
This also applies to the overall shape of the opening: arched, radiused, and other window shapes should all have shutters in the same shape. The idea is to cover and protect the window, just like they were designed to do (form follows function!).
Finally, there’s depth or thickness of the shutter. Take a look at the examples above and you’ll note just how chunky a good shutter is. They’re thick enough to sit off the building, producing a nice shadow line and pronounced depth from the siding or brick. Often you’ll see plastic or aluminum shutters so thin (and screwed right to the wall) that they may as well just be painted on. The versions we’re going with are a solid 1-¾” thick, beautiful substantial and in the right proportions – and right in line with the dimensions we found in our historical architectural catalogs!
See the differences between examples above and a too thin, too narrow, too tall shutter like below? Note how these shutters:
- Wouldn’t fit into the window opening if they closed (too tall)
- Wouldn’t cover the window area if they closed (too narrow)
- Look like floppy disk drives stuck to the siding (too thin)
Once you see it, you can never unsee it!
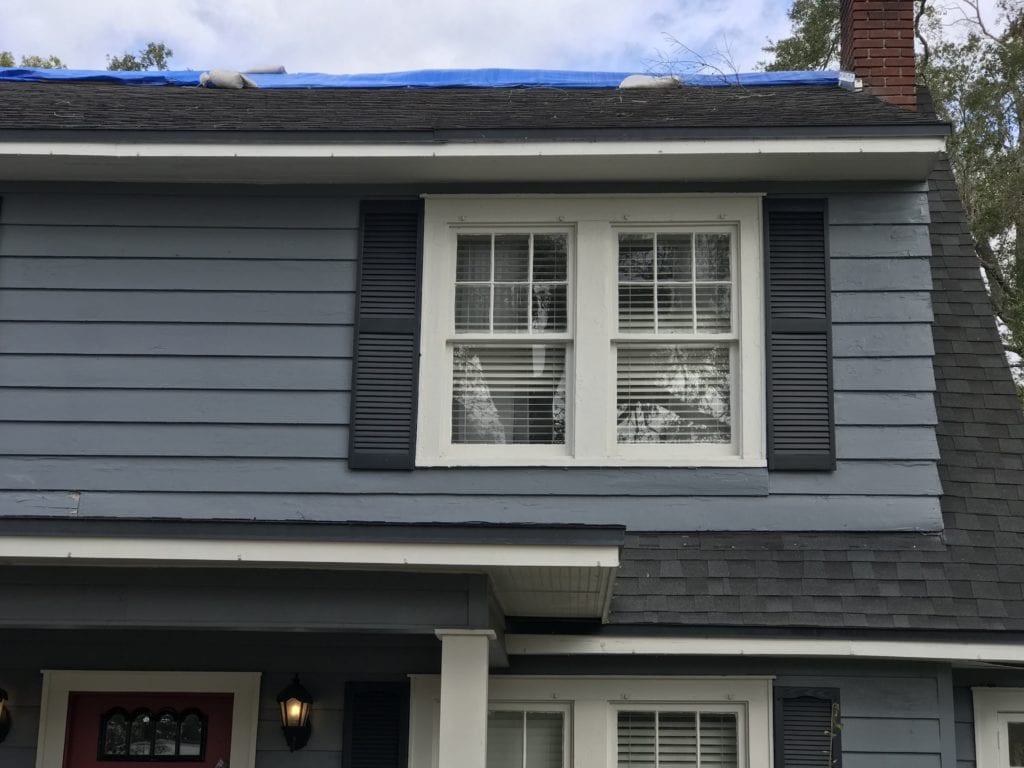
Credit: The Craftsman Blog
3- Position
As noted above: you want to avoid mounting your shutters directly to the side of your house. This gets a few things wrong:
- it becomes obvious that the shutters aren’t operable. And if they aren’t (at least appearing to be) operable, what’s the point?
- flat to the wall means the shutters are, in fact, mounted to the wall and not to the window casing, as would be required for the shutters to close in a position that actually closes the window
- you lose critical depth and shadow lines because you miss out on the important shadow lines and depth created by mounting to the window casing and on hinge that stands off the surface of the casing
Old House Guy has the most detailed guide we’ve found on proper positioning of your shutters, complete with drawings and sketches of key mounting conditions. When we read through those details, we knew we had to get this right for shutter success.
What’s most exciting about getting this right is that, yes, the shutters will at least appear to be functional (if not actually functional, like they will be for us!), but they add such important depth to the facade of a house. That’s especially important for us right now and we’re hoping it helps break up some of the vinyl siding (which, surprise, also lacks depth) until we’re ready to redo all the siding.
Finally, slat direction. If your shutters have louvers, you want those louvers to tilt down away from the house when the shutters are in closed position. This is true to their original function – protecting rain, wind, and snow from getting to the window and directing it away from the window on contact. Get this part right!
4- Paraphernalia
The fun doesn’t stop at the shutter panel itself!
Just like well-preserved and restored doors, windows, and cabinetry, the hardware and mechanics are the details that really make shutters sing on the facade of your house.
For most houses this is going to include:
- Hinges: a detail missing on most shutter installations, key to making your shutters appear operable and also to having them stand off the face of the house to provide the depth and shadow we’re looking for
- Tiebacks: often called ‘shutter dogs’, tiebacks hold your shutters in place when they’re in the open position, preventing them from swinging open and closed in the wind
- Pushrods (if operable louvers): if your shutters, like ours, are technically ‘outside blinds’, then historically at least some of the slats (louvers) would have been able to have their tilt angle changed with a pushrod
On hinges:
Your hinges will depend on the Period and style of shutter you’re working with, so you’ll want to investigate a little there. However you’ll also need to understand a little about where and how they’re going to be mounted, so that will be specific to your house. If you have window casings that sit proud of your siding, you’ve lots of choice in hinges, as this is how the home would have been historically built and a more historically accurate hinge is more likely to suit your situation. If, however, your window casing sits recessed into your building facade – such as when vinyl siding gets built out – you sadly may need a more modern style of hinge that pushes the shutter further off the building in order to open and close property and provide the appropriate gap (and therefore shadowline) off the house.
Our Victorian operable louver shutters (outside blinds) would have traditionally featured a mortised hinge and pintle like this:
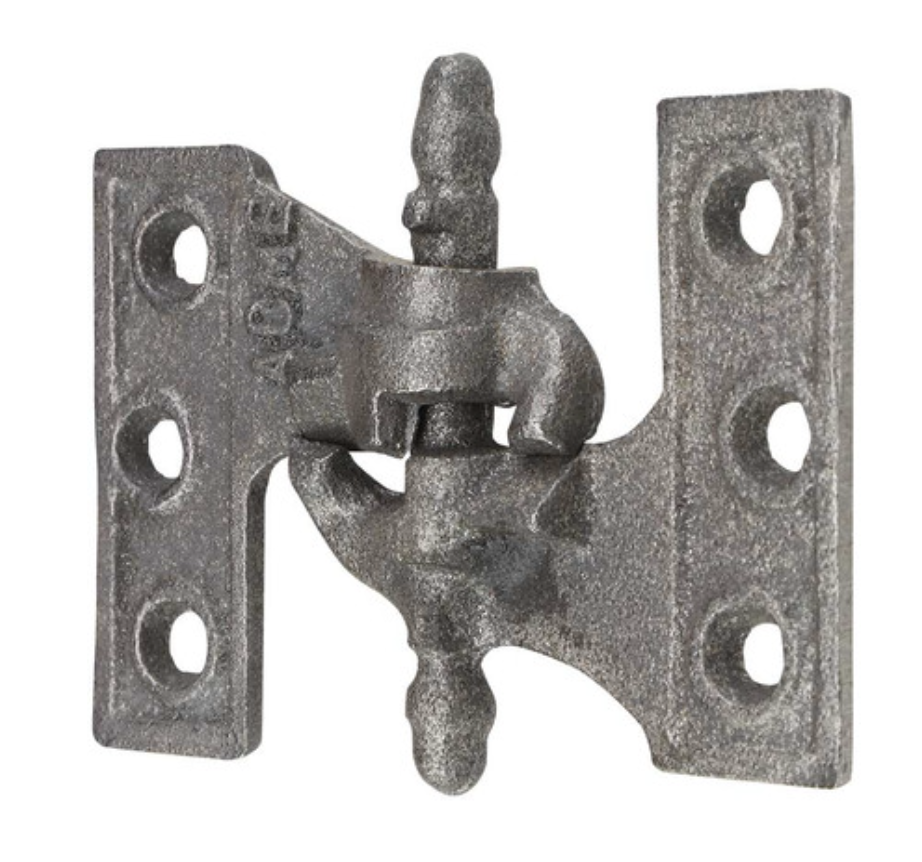
Photo: House of Antique Hardware
We’re quite (too?) familiar with this type of hinge, as Kevin stripped, cleaned, refinished, and repainted SEVENTY-SIX of them for all 38 shutters at the County House.
Speak with your shutter installer or manufacturer to check that your preferred hinge type will work with your window / facade conditions.
What we like about the hinges we ultimately picked is that they’ll push the shutter off the face of the house where closest to the windows (the inside edge of the shutter). The outside edge, when open, will sit closer to the face of the house. This little variance is one of the tiny details that adds up to a really convincing shutter reproduction and we love that we could make this happen. This is why #3 Position has to be considered together with your Paraphernalia choices. These factors work together to produce the best outcomes for your situation. See below for what I mean about how our shutters will sit on the house, with one edge further off the facade than the other:
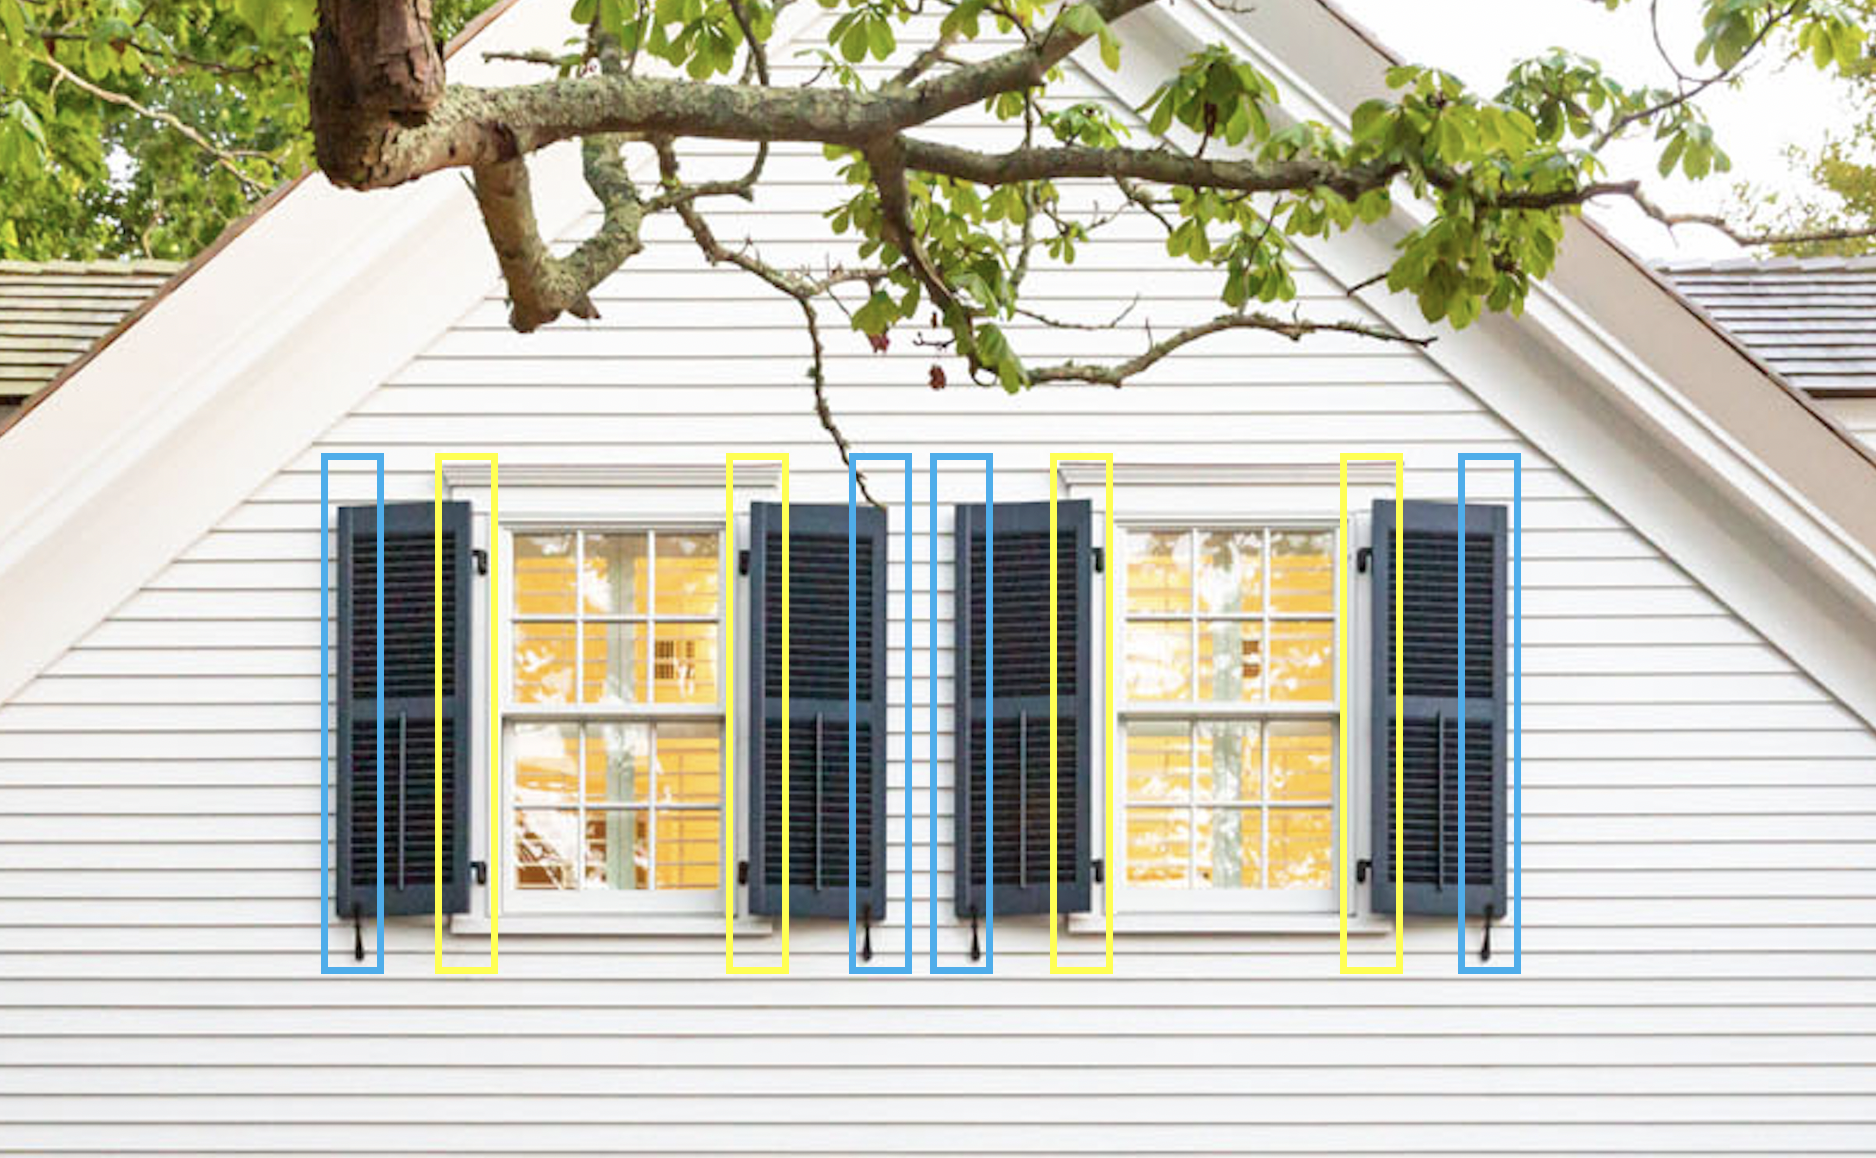
Note how the hinges, mounted on the window casing, push the inside edge of the shutters (highlighted yellow) off the building further than outside edges (highlighted blue), setting them at an angle slightly offset from the exterior wall.
On tiebacks:
Shutter dog choices will vary depending on the age of your house and style of shutter you’re working with. We know our house was fantastically ornate in its day, like many Victorians of that era, so our first inclination was a highly ornate tieback – scroll style ‘S’ shutter dogs:
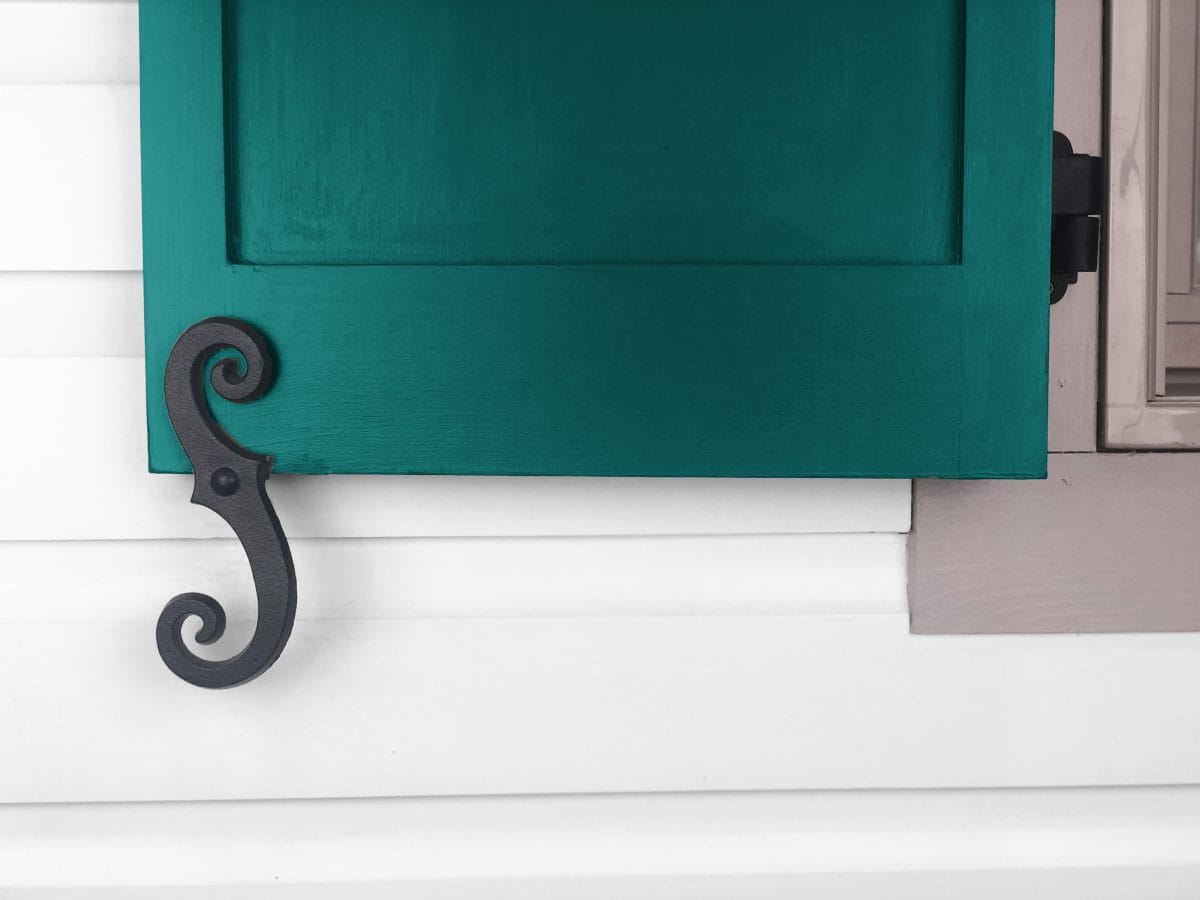
Photo Credit: John Wright Company – S Style Shutter Dogs
There’s some debate, however, as to what period these shutter dogs actually came into use. So, here, we fell back on clues we have from around the house. On the interior, many of the original door hinges and knobs feature cast floral patterns, so we knew we couldn’t go wrong when we saw the reproduction floral tieback that Mark at Canada Custom Shutters found for us:
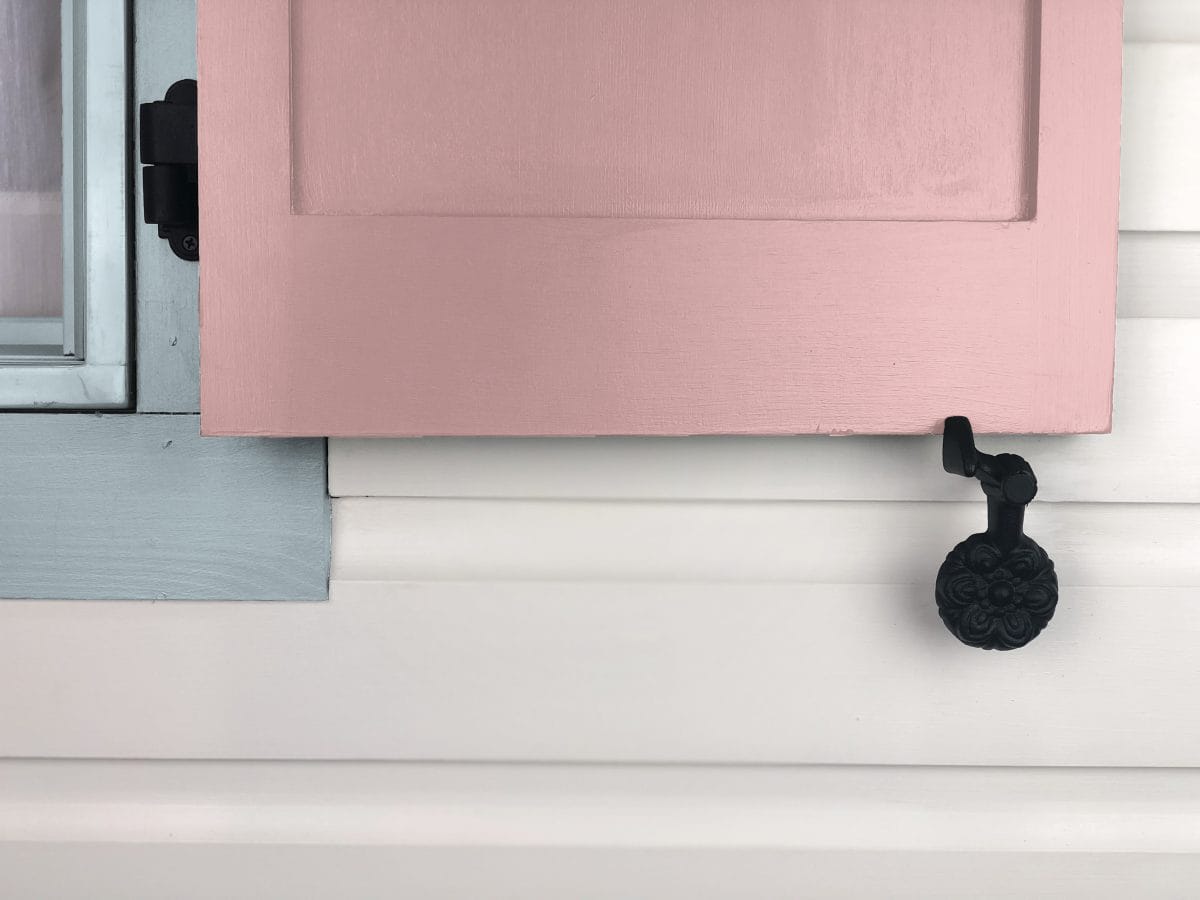
Source: John Wright Company
Shutter dogs get installed incorrectly all the time. Watch Brent Hull’s shutter installation overview to get the cool history on how shutter dogs are actually intended to work and you’ll understand where and how to mount them.
Finally, because we determined that our ‘outside blind’ versions had operable louvers, a push rod was a must. Our louvers will technically be fixed, ensuring they never come loose or break, but will look operable like the originals – and in large part because of the push rod we’ve added:
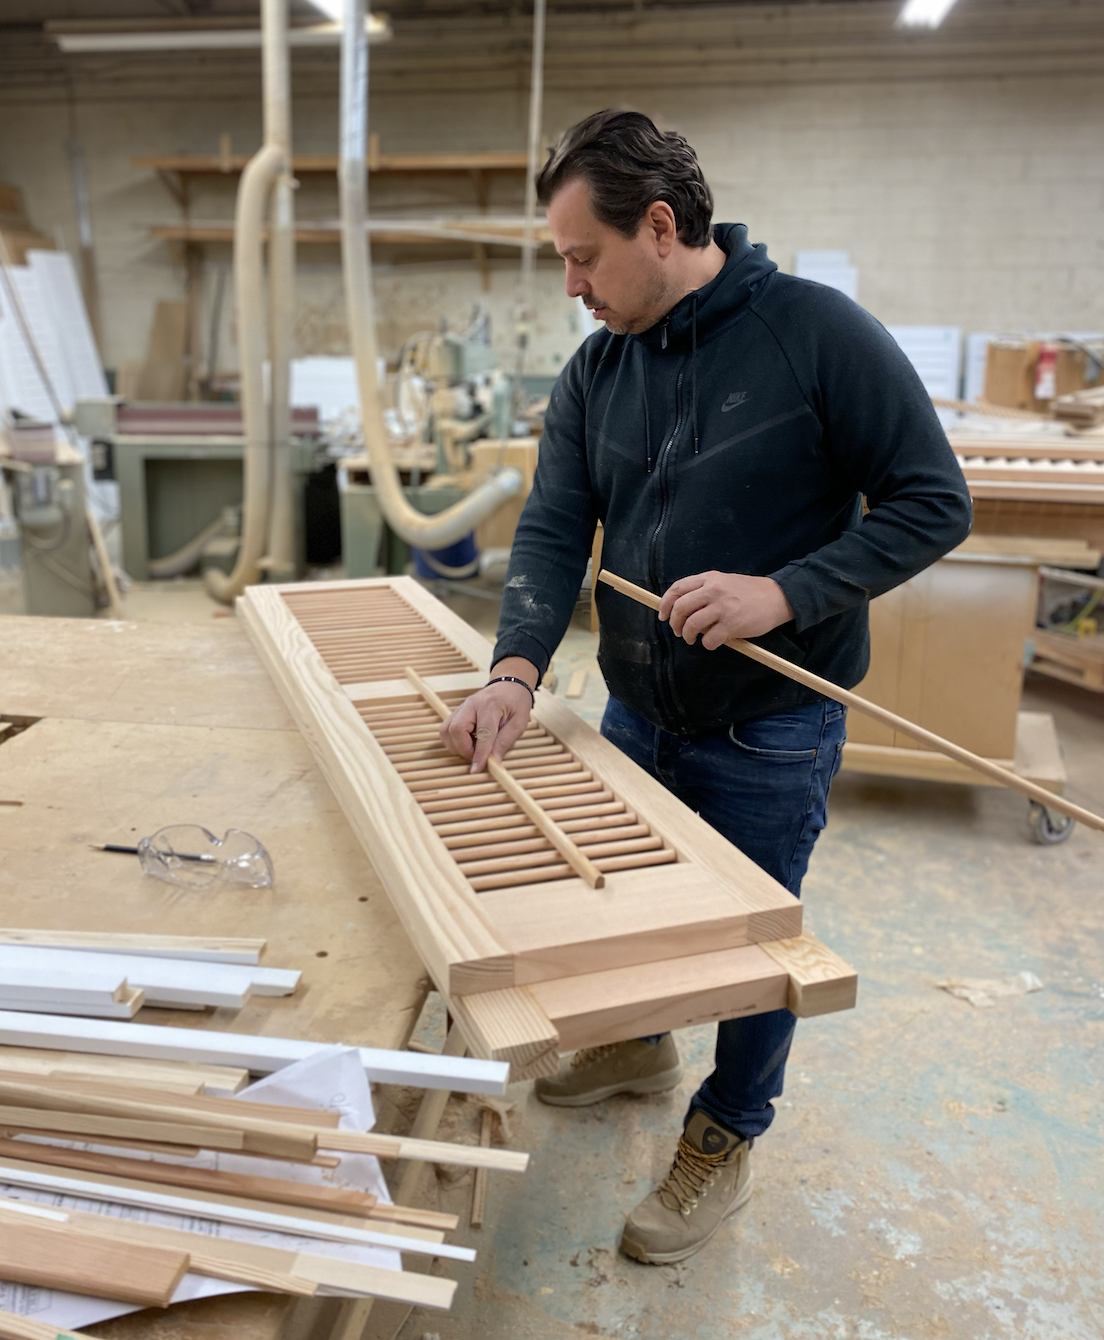
Mark from Canada Custom Shutters showing us how the pushrod will be installed on the louvers
5- Physical Material
What your shutters are made of is a big factor. I’ll be concise here:
Plastic tends to be really plastic looking. Some PVC options are better than others, but it’s PVC which sucks for all kinds of reasons (the environment being a big one). Like composite materials, plastic basically cannot be repaired. It’s marketing boasts of bring “maintenance free” should be thought of us “unable to be maintained”. We’re personally trying to rid the house of plastic and vinyl, not add more – so this was an easy ‘no’ for us.
Aluminum tends to be thin and floppy looking. They also dent which is about the biggest giveaway that they aren’t authentic.
Because plastic, composite, and aluminum are usually produced using stock profiles and standard sizes – they can be really difficult to find or customize with the details that are right for you. Louver tilt angle, for example, is often wrong and the louvers themselves lack depth and dimension.
For us, on a mission to restore the original design intent of the house, materiality is a big decision driver in everything we’re doing. Wood was the obvious choice – giving us everything we wanted in terms of historic accuracy, sustainability, aesthetics, repairability, and paintability.
From here, there’s plenty of types of wood to choose from. We know in our house, there’s a mix of pine (doors), oak (floors, stairs, interior elements), and douglas fir (windows). We opted for Douglas Fir, giving us a nice durable wood with good resistance to rot and insects.
Lots of people worry about wood on exterior applications. Having lived now in two 120+ year old homes with plenty of exterior wood features, it’s all about how the material is prepped, painted, and installed that makes the difference. Done well, it will last several lifetimes.
Here’s a view of the stock fir profiles that come in from Oregon to make the shutters:
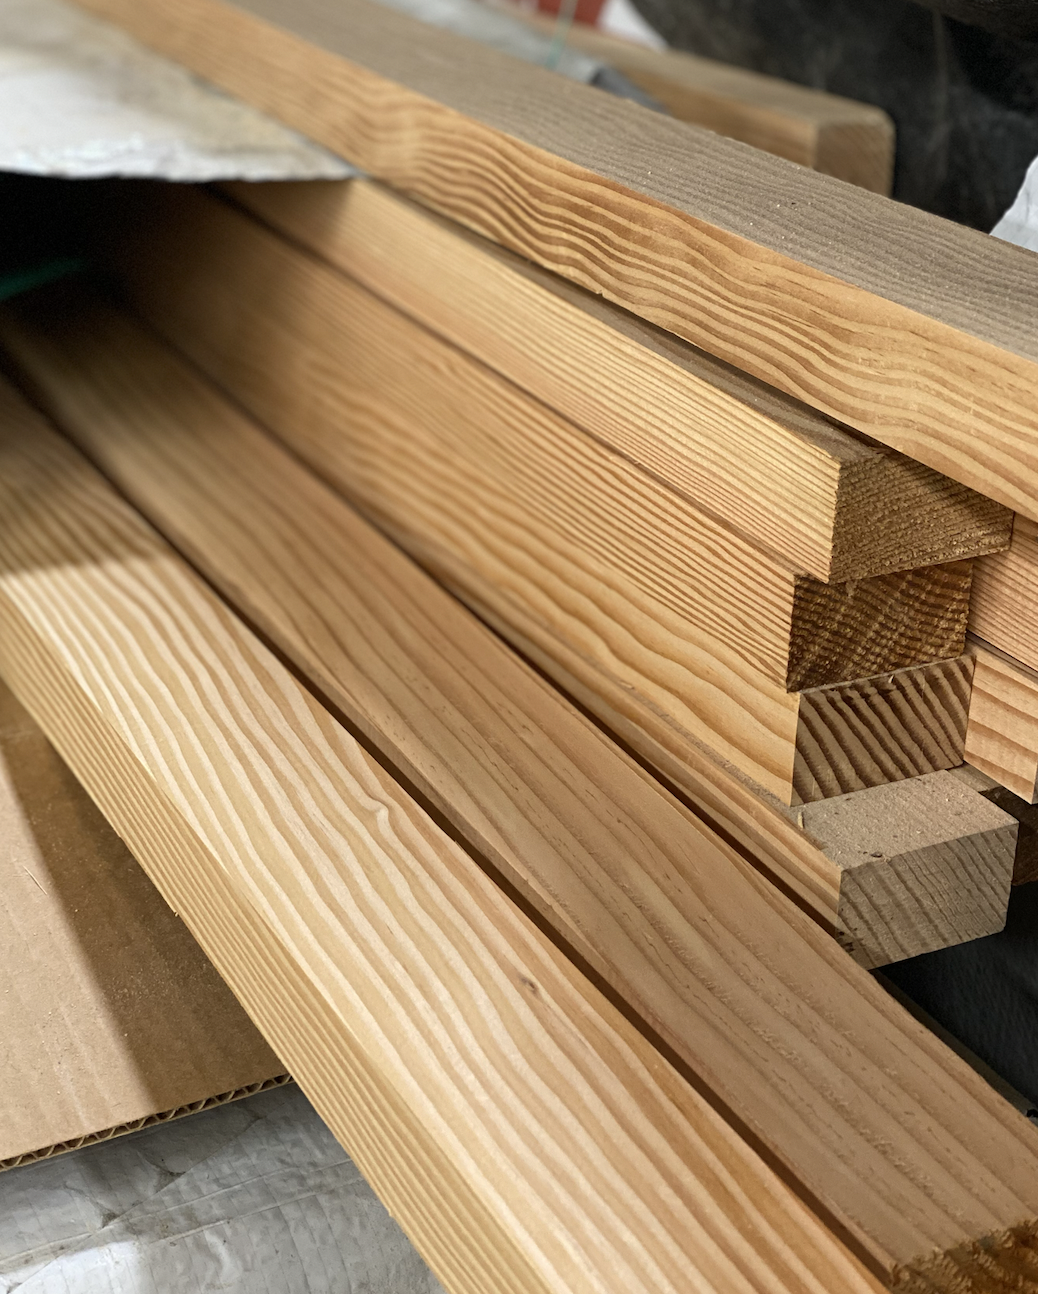
The fir profiles that will be used to make our shutters.
Mark at Canada Custom Shutters does a few things with wood shutters that has them last generations:
- Capped: the top of the shutter is capped, meaning no water sits on top or works its way into the stiles, rails, or slats.
- Architectural Finish: they’re prepped and painted with super high quality paint
6- Paint
If you’ve made it this far in your shutter journey, you really deserve to now be at the fun part – how are we going to paint these things?
Every single architectural, historic, and design source we referenced agreed: for the most part, shutters were painted green.
Different theories exist as to why. It is known that green paint contained a rust-prohibiting quality that helped to extend the life of shutter hinges and tiebacks.
That green also darkened over time, becoming more of a green-black. In fact, according to Old House Guy, many Colonial Revival Houses feature pure black shutters as a result of misinterpreting the actually green shutters on earlier homes.
Popular greens we’ve seen references are Benjamin Moore Essex Green HC-188 (Historical Collection), one that Mark at Canada Custom Shutters and Patrick Ahearn both swear by. It looks particularly beautiful set against white siding, as seen on many of CCS’ projects:
Essex Green Shutters on White House – Canada Custom Shutters

Historic Benjamin Moore Essex Green (HC-188)
It’s not that there weren’t other colours used for shutters historically. Black and Red were often used as well. And, if you know us, we’re also not believers that everything on the house needs to be a perfect shrine or museum-like dedication to history. If a decision is easily reversible (like paint), we like exploring options.
As much as we love the Essex Green or another black-green in that family, we had to consider the full picture:
1- right now, both front doors are the vibrant Benjamin Moore Patriot Blue . Blue and green can certainly work together, but it’s not exactly in line with our vision for the house. We also have the added risk of the house having pretty good western exposure, meaning full sunlight. A bright blue and the risk of a vibrant green isn’t for us.
We do have future plans to paint the front doors black (you heard it here first!), but that won’t happen until the enclosed porch is torn down (right now it shades it and black paint would sadly hide all the detail in the door, like a black hole). Could green shutters work with the black doors? For sure – but that’s a ways away.
Instead, we’re moving forward with another colour from Benjamin Moore’s Historic Collection. BM HC-190, Black. It’s classic, historic, and stately. We don’t run the risk of competing with the front doors. And, despite historical references of green shutters on white houses, there’s something classic and contemporary all at the same time about black on white.
Benjamin Moore HC-190
The shutters will be finished in a semi-gloss, giving us some nice variation from the matte siding and further enhancing the definition of the louvers, push rods, and other details.
Getting ready for our installation
Our 6 Ps for Shutter Perfection aren’t, well, perfect. But they work together as a great set of choices that, when made together, will increase the odds you get your shutters right. The details matter!
One final note: perfection isn’t the aim. If it was, none of this work would ever get done. Even the experts we listed above make tradeoffs in their own shutter restoration and reproduction work for one reason or another: Brent actually installed his panelled shutters backwards on purpose to show off the prettier panel detail when in open position; Ken recommends a more modern clip as a tieback on Victorian shutters instead of more traditional shutter dogs; and Patrick uses ‘S’ style shutter dogs on homes of all periods and architectural styles (hey, they’re pretty!).
Stay tuned – because next week we’re going to put all this theory to the test when we INSTALL the shutters and reveal the new look for the front of the house!
It seems like long ago that Mark first came by with a mockup of a shutter (below) and we first fell in love with the authenticity. Months of research, planning, production, sourcing hardware, and painfully picking colours are about to come to fruition!
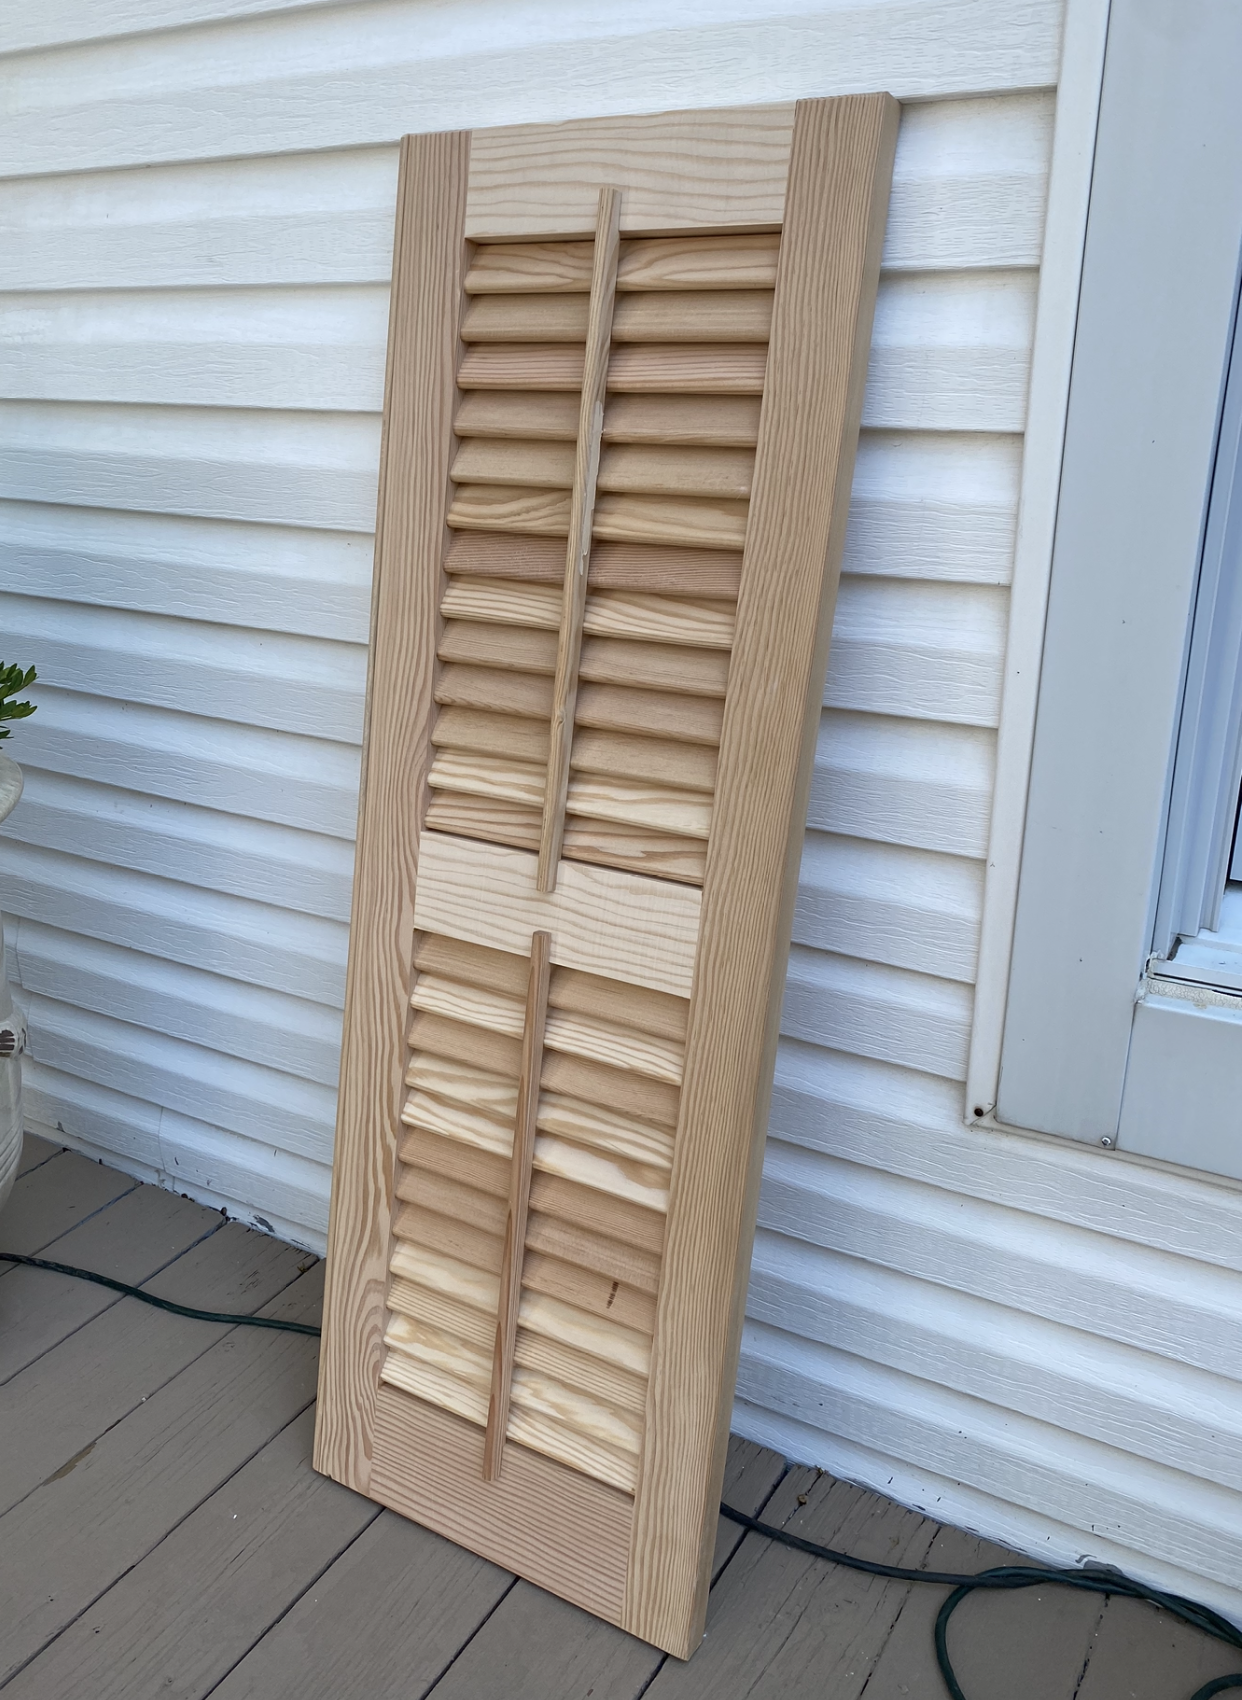
Mockup Shutter – Canada Custom Shutters


Hi folks,
You have a spelling mistake in your article. “Pouring” is what you do to liquids. But you “pore over” documents pr information, meaning to examine closely.
https://www.dictionary.com/e/pore-over-vs-pour-over/
thank you!